

It's that time of year again between the onset of the holidays and the harvests some parts of our garden may start to seem ngelected. Here is your PSA now-it's timke to dig your dahlias! If you are a first time grower of Dahlias and you are anyway in a colder zone (ahem most of my fellow Canadian's, I'm looking at you), then you should know that Dahli tubers do not fare well overwintering in the ground. They will not survive freezing and so now is the time to start thinking about digging and storing them over winter. It can seem like a duanting task, especially for the novice grower but don't worry-I got you! I've broken the process down into several simple steps.
Before you begin ensure you have some storage solutions ready to go. My favourite solutions are a paper bag or cardboard box (optional-you can put some woodshavings in the box too).
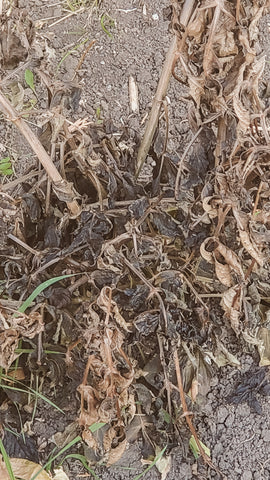
Step One: Are they ready to dig?
Dahlias should be dug out of the ground, after the first hard frost. The hard frost will cause the plant to start to die back. You can see in this image that my dahlia is looking pretty done!
Step Two: Digging your Dahlias
To begin with I cut my Dahlia back and leave a few inches of the main, thick stem sticking above the ground. I prefer a pitchfork to dig and essentially I think of it like digging potatoes, I don't want to pierce the tubers. So I start digging around my dahlia, making a circle around the plant and then think "dig under and lift up". I start to dig almost under the plant, and push up. The dahlia should come loose and at a certain point i can just pull it away from the ground. You should pull the main stem and as it comes out of the ground you will notice all the tubers attached! You can shake away much of the excess soil at this point.
In the image you can see the tubers dug up, still attached to the stem.

Step Three: Rinsing your Dahlias
The next step is to rinse your Dahlia tubers- give them a good shower with the hose. Check for signs of rot or damage (you should not store any damaged tubers). At this stage you can also cut more of the stem and plant away if any is left on. You may want to separate your Dahlia tubers if you notice that certain tubers have "eyes" on them-where the new stem will grow, then you can separate them from the others. Once your dahlias are rinsed clean you will need to allow them to dry for upto several weeks, out direct sunlight, in your home before putting away into longer term storage. In the image, the tubers are all cleaned, they will then be sorted into "keep" or "not keep"

Step Four Storage:
In order to store your tubers over the next coming months, they require storage that is dry, cool and dark. I prefer to store in a cardboard box or paper bag, label it and then punch several holes in the bag or box just to allow for some air circulation. Although not necessary I do sprinkle some woodshavings in the box just because I want to absorb any excess moisture that may find it's way in there. You do not want the tubers to freeze over winter so bear in mind I wouldn't store in a shed or garage where I am based as unless it is heated, it will get below zero in the shed!
Step Five: Enjoy your Dahlias in the Spring!
All you have to do come Spring, is simply replant your tubers!